A guitar amp is an incredibly versatile tool that can take a bit of a learning curve to master. Understanding your amp’s controls and settings is essential to shaping your sound and bringing it to a new level.
Knowing how to manage feedback, using the signal chain, and incorporating effects will not only enhance your creativity but will also allow you to craft unique and expressive performances.
Videos by American Songwriter
If all that sounds like a lot, don’t worry: we got you covered! In this article, we’re going to cover the basics—and not-so-basics—of amp usage so you can set yours up like a pro.
Types of Guitar Amplifiers
The type of guitar amp you choose can significantly affect how it should be used and the kind of sound it will produce.
Tube Amps (Valve Amps)
Tube amplifiers use vacuum tubes (valves) to amplify your guitar’s signal. They are known for their warm, vintage, and organic sound and harmonically rich tones.
When a tube amp is pushed to higher volumes, it begins to saturate and produce a soft distortion known as “tube saturation” or “tube overdrive.” Many musicians prefer this distorted tone.
These guitar amps are often associated with vintage and classic sounds since this is how many iconic guitar tones from the ‘50s, ’60s, and ’70s were achieved.
They are often favored in live performances because of their ability to project well on stage and their pleasant tone.
Solid-State Amps
Solid-state amps are known for their clean, transparent sound and for reproducing the input signal faithfully, without a distorted sound, making them ideal for genres that require a pristine, uncolored tone.
They are generally more durable than tube amps since they have no fragile vacuum tubes to replace, making them low-maintenance and dependable for gigging and touring musicians.
The tone of a solid-state amp will remain consistent regardless of volume levels, which means you can achieve the same sound quality at both low and high volumes without worrying about an unwanted distorted tone.
Many solid-state electric guitar amps come with built-in effects like reverb, chorus, and delay, offering convenience and versatility in a single unit.
Modeling Amps
Modeling amps are highly versatile, as they use digital technology to emulate the tones of various classic electric guitar amps, like Fender amps or Marshall amps, as well as a wide range of effects pedals.
Modeling technology has come a long way in recent years and is capable of authentically replicating the specific characteristics of many different amps.
Built-in effects such as reverb, delay, chorus, distortion, and many more can be easily dialed in, customized, and combined to create a truly versatile palette without the need to carry around tons of pedals.
Modeling amps also tend to be very user-friendly interfaces, making them accessible to players of all skill levels, particularly beginners.
Acoustic Guitar Amps
Acoustic amps are specifically designed to amplify the sound of acoustic instruments and reproduce their natural and transparent sound accurately.
Some acoustic guitar amps feature built-in effects like reverb and chorus to add depth and ambiance to your sound. They also typically come with EQ controls, including bass, midrange, and treble knobs, to shape your instrument’s tone to your liking.
Feedback can be a common issue when amplifying acoustic guitars, so acoustic amps often include feedback suppression features or notch filters to help control and eliminate feedback.
Setting Up Your Amplifier
Before Powering On
- Make sure that all cables (power, instrument, speaker) are securely connected to the amp and your guitar.
- Before turning on the amp, set all volume and tone knobs to zero. This prevents sudden loud noises or feedback when the amp is powered on.
- Check that the voltage selector on the back of your amp is set to the correct voltage for your region. Using the wrong voltage can damage your guitar amp.
Powering On
- If your guitar amp has a standby switch, turn it on before powering on the main power switch. The standby switch allows the tubes to warm up gradually, which can prolong their lifespan.
- Turn on the main power switch. Wait a moment to allow the tubes to warm up.
- Slowly increase the volume to your desired level, listening for any unusual noises or issues as you go.
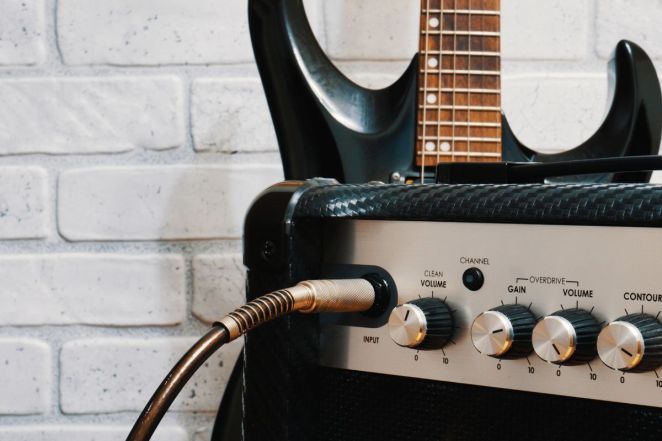
Inputs
Selecting the appropriate input for your instrument on an amp is necessary for achieving the best sound quality and preventing any damage.
- Check Input Types: Identify the available input types on your guitar amp and select the appropriate one. Common input types include:
- Instrument Input: Used for electric guitars or basses with passive pickups (the most common type). If you have an active pickup system, such as those found in many acoustic-electric guitars, you can often use either the instrument or DI input.
- Microphone Input: Used for dynamic or condenser microphones.
- Line Input: Designed for keyboards, synthesizers, drum machines, and other line-level sources.
- DI (Direct Input): Some devices have a DI designed for acoustic guitars and instruments with built-in pickups. The DI input may provide additional tone-shaping options or a dedicated preamp for acoustic instruments.
- Adjust Gain or Volume Settings: Set the gain or volume control for the selected input to a low setting and gradually increase it until you achieve the desired level without clipping or distortion.
- Monitor and Test: Always listen carefully and test your instrument or microphone after selecting the input to ensure it sounds as expected and is at the right level.
Connecting an Amplifier to a Speaker Cabinet
Connecting an electric guitar amplifier to a compatible speaker cabinet can help avoid damage to the amp and the speakers. One important aspect to consider is the impedance, measured in ohms (Ω), of both the amp’s output and the speaker cabinet’s input. Here’s the correct way to connect them while keeping impedance in mind:
- Check Amp Output Impedance: You can find this on your amp’s specifications. Guitar amps typically have a designated output impedance rating, such as 4Ω, 8Ω, or 16Ω.
- Check Speaker Cabinet Input Impedance: This is often labeled on the back or in the manual. Common values include 4Ω, 8Ω, and 16Ω.
- Match Impedances: Ideally, you should connect an electric guitar amp to a speaker cabinet with the same impedance rating. E.g. if your amplifier has an 8Ω output, connect it to an 8Ω speaker cabinet.
- Connecting: Use an appropriate speaker cable with compatible connectors (usually 1/4-inch jacks) to connect the amp’s speaker output to the speaker cabinet’s input.
- Set Speaker Cabinet Selector: Some electric guitar amps, especially those with multiple speaker outputs, may have a selector switch to choose the appropriate output impedance. Make sure it matches the impedance of your speaker cabinet.
Precautions
- Wear ear protection when turning on or adjusting your amp, especially if you’re using high-wattage amps or headphones.
- Make sure that your guitar amp has adequate ventilation. Amplifiers generate heat, sp proper airflow helps prevent overheating, which extends their lifespan.
- Keep beverages and other liquids away from your amp to prevent accidental spills.
- Never leave your amplifier unattended while it’s powered on, especially if it’s at high volume levels.
- Use a surge protector to protect your guitar amp from voltage spikes and surges.
- When not in use, store your amp in a safe and dry environment. Keep it covered to prevent dust and debris from accumulating inside.
- Perform regular maintenance as recommended by the manufacturer.
- Always power off your guitar amp when you’re done to conserve energy and reduce wear on components.
Basic Amplifier Controls
Here are some of the basic controls you can find on most guitar amps and some tips on how to use them effectively:
Volume Knob
How It Works: Volume controls manage the output level, determining how loud the sound will be.
Tips: Start with a lower volume setting and gradually increase it until you reach your desired volume. Avoid setting it too high to prevent distortion, speaker damage, and hearing damage.
Gain Knob
How It Works: Often found on the amp’s preamp or overdrive channel, it adjusts the amount of signal distortion or overdrive. It shapes the character and saturation of your guitar’s tone.
Tips: To find the right balance, start with the gain control at a low setting for a cleaner sound. Gradually increase it to add more distortion or overdrive to get your perfect tone.
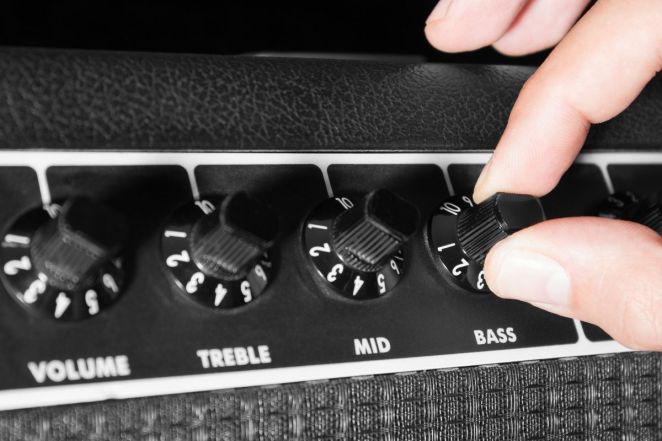
Tone (Bass, Midrange, and Treble)
How They Work: Tone knobs adjust the EQ settings of your guitar sound. Bass adjusts the low frequencies, midrange controls the mid-range frequencies, and treble adjusts the high frequencies.
Adjustment Tips: Use these controls to shape your tone until you find the levels you like. Start with all controls at the midpoint. To add warmth, boost the bass; for clarity, boost the treble; for presence, adjust the midrange.
Effects Controls
How They Work: Effects controls adjust the amount and intensity of built-in effects, such as reverb, delay, chorus, or others.
Tips: These controls add ambiance and depth to your sound. Start with a low setting and increase it gradually. The specific effect parameters (e.g., delay time or reverb decay) may also be adjustable depending on the amp.
Using Amplifier Channels and Modes
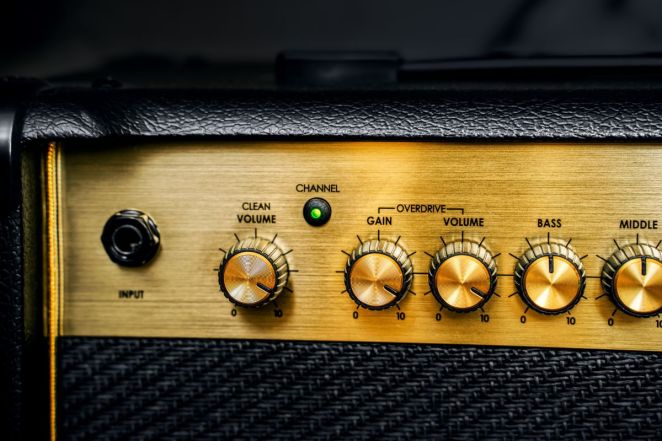
Clean Channel
The clean channel on an electric guitar amplifier produces a clear and undistorted sound, meaning there’s minimal or no clipping or saturation of the signal.
A clean sound is characterized by its clarity, dynamics, and a lack of significant distortion. It is often used for genres like jazz, country, and clean blues.
Check out our list of the best amps for clean tones for more info.
Overdrive/Distortion Channel
The overdrive channel introduces varying degrees of clipping, saturation, and compression to the signal of your electric guitar.
Overdrive tones are characterized by their grit, sustain, and harmonic complexity. They are commonly used in rock, metal, blues, and other genres that require a more aggressive and sustain-rich sound.
Balancing Your Sound
Achieving a balanced sound is not just about matching volume levels but also involves coordinating the settings of both the clean and overdrive channels to find your preferred settings. Here are some tips on how to do that:
- Clean-to-Overdrive Transitions: If your amp has a foot switch or channel switch button, practice switching between both channels on the fly. This will allow you to seamlessly transition between clean and distorted passages in a song.
- Volume Levels: Keep both channels at roughly similar volume levels when engaged, since a significant volume disparity can disrupt your performance.
- Gain Staging: Pay attention to the gain settings on both channels. If you’re using guitar pedals, be aware of their impact on gain. For example, a boost pedal can push an overdrive channel into higher gain territory, so you should adjust it accordingly.
- Tone Controls: Consider how the tone controls affect your sound on both channels and make adjustments as needed to maintain a consistent tone.
- Use of Effects: If you’re using effects like delay, reverb, or modulation, consider how they interact with both tones.
Advanced Amplifier Features
Effects Loop
This is a feature found on many amps and is used to place external pedals and signal processing devices into the amplifier’s signal chain at a specific point. This gives you more precise control over your tone.
To connect and use external effects pedals with an effects loop, follow these steps:
- Identify the Effects Loop Jacks: Locate the send and return jacks on your amplifier. These are often labeled as “FX Send” and “FX Return”.
- Connect Your Pedals: Plug a 1/4-inch instrument cable into the “Send” jack of the effects loop. Connect the other end of the cable to the input of your first effects pedal.
- Pedal Chain: Connect your external effects pedals in the desired order. The “Send” from the amplifier goes into the input of your first pedal. Then you connect the output of that pedal to the input of the next, and so on.
- Final Pedal: Connect the output of your last effects pedal back into your amplifier’s “Return” jack.
- Activate the Effects Loop: On most amps, there is a switch or button that allows you to activate or bypass the effects loop. Make sure it’s engaged.
- Set Levels and Adjust: Adjust the levels on your effects pedals as needed to achieve the sound you want. Use the amplifier’s effects loop controls, if available, to set the level of the loop and adjust the mix of the processed signal.
Don’t be afraid to play around with the placement of your effects pedals!
Speaker Cabinets
You need to consider several factors when choosing the right speaker cabinet for your amp decision, including size, type, and speaker configuration.
Amplifier Compatibility
Make sure the speaker cabinet you choose is compatible with the output impedance of your amplifier.
Size of the Speaker Cabinet
The size of the speaker cabinet can affect its portability and the dispersion of sound.
Combo amps have the amplifier head and speaker cabinet integrated into a single unit, making them more portable.
Stack configurations separate the amplifier head from the speaker cabinet, which can offer greater versatility but may be bulkier and heavier.
Think about where you’ll be using the amplifier and speaker cabinet. Smaller venues may require the more compact setup of a combo amp, while larger stages may benefit from a bigger speaker cabinet for increased projection.
Speaker Type
Common speaker types include:
Celestion: Known for their classic British rock tone.
Eminence: Offer a wide range of speaker models suitable for various music genres.
Jensen: Known for their vintage-style speakers.
Alnico vs. Ceramic: Consider whether you prefer the warmth of alnico or the efficiency and punch of ceramic magnets.
Speaker Configuration
The number of speakers and their arrangement in the cabinet, often referred to as the “speaker configuration,” can affect your tone and volume. Common configurations include:
- 1×12: A single 12-inch speaker, which provides a balance of portability and tone.
- 2×12: Two 12-inch speakers, offering a fuller sound with more projection than a single speaker.
- 4×12: Four 12-inch speakers, often associated with a massive, high-volume sound.
- 1×10, 2×10, 4×10, etc.: Similar configurations with 10-inch speakers, which can provide a different tone compared to 12-inch speakers.
Different speakers and cabinet configurations are associated with specific genres. Decide on the tone and volume you want to achieve and find out which configuration would suit you best.
Amplifier Maintenance
We’ve mentioned before that tube amps tend to require some maintenance to ensure their longevity and optimal performance. Here are some key maintenance steps:
1. Power Off and Unplug: Always turn off and unplug your amp when not in use or when performing maintenance. Tubes can become very hot during operation and working with live voltages can be dangerous.
2. Warm-Up Time: Tubes require a warm-up period before they reach their optimal performance. Let your guitar amp warm up for 5-15 minutes before playing.
3. Keep the Amplifier Clean: Dust and debris can accumulate inside your guitar amp, potentially affecting its performance. Periodically turn off and unplug the amp and gently clean the exterior with a soft, dry cloth. Your amp will also need proper ventilation for cooling.
4. Tube Inspection and Testing: Periodically inspect the tubes for signs of damage, such as cracks, loose bases, or burned-out filaments. Replace any damaged tubes immediately.
6. Clean Tube Sockets and Pins: They can accumulate oxidation and dust over time, affecting the connection between the tubes and the sockets. Use a contact cleaner specifically designed for electronics to gently clean them. Avoid bending the pins.
7. Transport and Storage: When transporting your amplifier, secure the tubes in their sockets using tube retainers or a soft material to prevent them from shaking or breaking during transit.
Store your amplifier in a cool, dry place away from extreme temperatures and humidity.
Finding Your Sound
Finding your sound isn’t always easy and it’s rarely straightforward. The key lies in experimenting with all your equipment, including your amp.
Guitar players all have unique preferences for tone and sound, so finding your signature tone requires exploration. Experimenting with different amp settings, EQ configurations, and pedal combinations will help you discover your own style.
The context in which you play music can also vary greatly. A small club, a large arena, a studio, or a jam session all require different acoustics, volume settings, and styles. Exploring your amplifier’s capabilities helps you adapt and optimize your sound for different settings.
Electric guitar amps and effects pedals offer a wide range of possibilities. It’s only through extensive experimentation that you can uncover new sounds, textures, and effects that can inspire your creativity and push your boundaries. Trying unconventional settings or combining effects in novel ways can lead to unexpected and exciting results.
Most amplifiers come with a variety of features, modes, and controls. Exploring them will help you unlock your amp’s full potential.
Frequently Asked Questions (FAQs)
How do I choose the right amplifier for my guitar-playing style?
Choosing the right amp for you involves finding a balance between your musical preferences, budget, and practical considerations. Taking everything we’ve outlined in this guide you can select an amp that complements your guitar’s sound and allows you to express your creativity.
How can I troubleshoot common amplifier issues like noise, hum, or crackling sounds?
Here are some easy steps to diagnose and address some of the most common amp issues:
- Check cable connections and make sure they’re all securely plugged in. Loose or damaged cables can potentially create unwanted noise. Try swapping out cables one at a time to find the problem.
- Clean input and output jacks.
- Try to isolate the source of the problem by disconnecting any pedals or additional equipment from the signal chain. If the noise disappears, gradually reintroduce each component to identify the culprit.
- If possible, try a different guitar to see if the noise persists. Some guitar electronics or pickups can contribute to noise problems.
- Plug your amp into a different power outlet to check if the issue is related to the electrical circuit in your location.
- Turn off or move away from sources of electromagnetic interference, such as fluorescent lights, radios, computer monitors, or other electronic devices.
- If you are unable to identify or resolve the issue on your own, it’s better to seek the assistance of a qualified amplifier technician or repair professional (note: attempting to repair or modify your amp without the proper safety equipment and training can be dangerous, even fatal. DO NOT attempt!).
Conclusion
We’re sure this comprehensive guide on how to use your electric guitar amp will help you optimize your sound, troubleshoot issues, and ultimately bring your musical experience as a guitarist to another level.
Don’t be afraid to push boundaries, make mistakes, and discover what sets your sound apart. With dedication and exploration, you’ll find that your amp can be a limitless source of inspiration.
Embrace the power of your amplifier, and let your music soar to new heights. Rock on!
Why not take a look at the best guitar speakers while you’re at it?